Chat with us
FREE Leafbud Umbrella on Prepaid Orders Above INR 4,500/-
FREE Leafbud Umbrella on Prepaid Orders Above INR 4,500/-
FREE Leafbud Umbrella on Prepaid Orders Above INR 4,500/-
FREE Leafbud Umbrella on Prepaid Orders Above INR 4,500/-
FREE Leafbud Umbrella on Prepaid Orders Above INR 4,500/-
FREE Leafbud Umbrella on Prepaid Orders Above INR 4,500/-
FREE Leafbud Umbrella on Prepaid Orders Above INR 4,500/-
FREE Leafbud Umbrella on Prepaid Orders Above INR 4,500/-



How Are Ceramic Plates Manufactured?

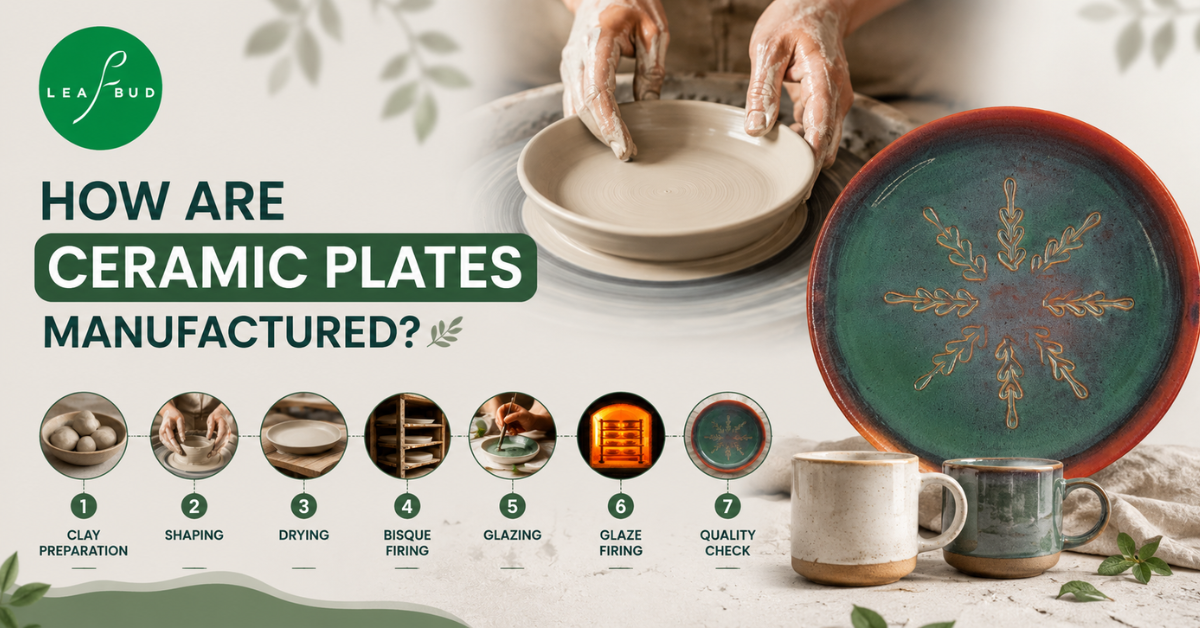
Ever picked up a ceramic plate and wondered how a lump of clay turns into something that sits on your dining table for years? The process behind ceramic plates is part craft and part chemistry, and it has barely changed at its core for thousands of years, even though modern tools have sped things up.
Whether a plate comes off a factory line or off a potter’s wheel, it goes through the same broad stages: preparing the clay, shaping it, drying it, firing it, glazing it, and firing it again. Let’s break down each step so you know exactly what goes into the plate you eat off every day.
Step 1: Preparing the Clay Body
Every ceramic plate starts with raw clay, mixed with water and other minerals such as silica and feldspar to get the right texture and strength. Workers blend clay and water in large mixers, adding roughly 20 to 30 percent water to reach a workable consistency. The mix is then kneaded or wedged by hand or machine to remove air bubbles, since trapped air can cause a plate to crack or even explode during firing.
The type of clay chosen at this stage decides a lot about the final plate. Earthenware clay is more porous and fires at a lower temperature, while stoneware and porcelain clays are denser and can handle higher heat, which makes them sturdier for everyday use.
Step 2: Shaping the Plate
Once the clay reaches the right consistency, it takes shape through one of a few methods:
- Wheel throwing: The clay is centred on a spinning pottery wheel and shaped by hand. This is how most handmade plates and bowls come to life, and it is why no two wheel-thrown pieces look exactly alike.
- Jiggering: A mechanical process where a mold and a rotating tool press the clay into a plate shape. Factories use this method for large batch production.
- Slip casting: Liquid clay, called slip, is poured into a plaster mold and left to set. This works well for plates with detailed shapes or edges.
- Hand building: Pinch, coil, or slab techniques are used for smaller studios or artistic pieces where each plate is formed entirely by hand.
Wall thickness matters here. A plate that is too thin dries and fires unevenly, while one that is too thick takes longer to dry and is more prone to cracking.
Step 3: Trimming and Drying
Once the plate holds its shape, it goes through trimming, where a potter smooths the surface, refines the edges, and shapes the foot at the base of the plate. Any seams or mold lines from casting are cleaned up with a sponge or a soft blade at this point too.
After trimming, the plate needs to dry slowly and completely before it can go anywhere near a kiln. This stage, sometimes called the greenware stage, can take anywhere from a few days to over a week depending on the thickness of the piece. Drying too quickly causes warping or cracks, so patience matters more than speed here.
Step 4: The First Firing (Bisque Firing)
Once the plate is bone dry, it goes into the kiln for its first firing, known as bisque firing. This stage typically reaches temperatures between 900°C and 1,000°C. Bisque firing hardens the clay and burns off any remaining moisture and organic material, turning the fragile greenware into a stronger, slightly porous form that can absorb glaze evenly.
This firing usually takes several hours to reach full temperature, followed by an equally long cooling period, since rushing the cooling can crack the piece just as easily as rushing the heating.
Step 5: Glazing
Once the bisque-fired plate has cooled, it is ready for glaze, a liquid coating made from minerals and pigments that gives the plate its colour, shine, and a smooth, food-safe surface. Glaze can be applied by dipping the plate directly into a glaze bath, brushing it on by hand, pouring it over the surface, or spraying it for an even coat.
This is where artistry comes in. Colour, pattern, and finish, whether glossy, matte, or textured, all depend on the glaze recipe and the way it is applied. Some pieces get a layer of coloured slip before the glaze goes on, which adds depth to the final pattern.
Step 6: The Second Firing (Glaze Firing)
The glazed plate goes back into the kiln for a second and final firing, usually at a higher temperature than the bisque firing, often between 1,150°C and 1,300°C depending on the clay and glaze used. This firing melts the glaze into a glossy or matte layer that fuses permanently with the clay body underneath.
The heat also fully vitrifies the clay, meaning the particles fuse together tightly, which makes the plate stronger, less porous, and better able to hold liquids without soaking through. A full firing and cooling cycle for this stage can take close to a full day from start to finish.
Step 7: Quality Check and Finishing
Once the kiln cools and the plates come out, each piece is inspected for cracks, glaze flaws, or uneven firing. The base of each plate is often smoothed or sanded so it sits flat and does not scratch table surfaces. Any plate that does not meet quality standards gets set aside rather than shipped out.
For handmade ceramic plates, this stage carries extra weight. Since every piece is shaped individually rather than pressed from an identical mold, small variations in glaze pooling, colour depth, or surface texture are part of the charm rather than a flaw. This is exactly why brands like Leafbud describe each ceramic plate as one of a kind rather than a copy of a template.
Handmade vs Factory-Made Ceramic Plates
| Aspect | Handmade Ceramic Plates | Factory-Made Ceramic Plates |
| Shaping method | Wheel throwing or hand building | Jiggering or slip casting on machines |
| Consistency | Slight natural variation in each piece | Uniform shape and size across batches |
| Production speed | Slower, often days to weeks per batch | Faster, built for large volume |
| Character | Each plate carries the maker’s touch | Every plate looks identical |
| Typical source | Independent potters and small studios | Large-scale ceramic factories |
Both approaches use the same basic stages of clay preparation, shaping, drying, and firing. The real difference lies in scale and in how much of the work is done by hand.
Why the Process Matters for Quality
Every step in this chain affects how a ceramic plate performs at home. Clay that is not wedged properly can trap air and crack later. Drying too fast warps the shape. An uneven glaze coat leaves rough patches that trap food residue. A rushed firing schedule weakens the plate’s structure and makes it more prone to chipping.
This is why ceramic dinnerware made by skilled artisans, with attention paid to each stage rather than rushing to fill an order, tends to hold up better over years of daily use. At Leafbud, our ceramic plates and other serveware are wheel-thrown and hand-glazed by independent potters across India, fired in small batches rather than mass-produced lines. That slower process is part of what gives each piece its individual character.
Final Thoughts
Making a ceramic plate is a longer journey than most people realise, from wedging raw clay to two separate trips through a kiln that can reach over 1,200°C. Each stage, shaping, drying, bisque firing, glazing, and glaze firing, builds on the one before it, and skipping steps or rushing them shows up in the finished piece. The next time you set the table, that plate carries a lot more craft behind it than a quick glance would suggest.
Frequently Asked Questions
1. How long does it take to make a ceramic plate?
A handmade ceramic plate typically takes one to three weeks from start to finish, once you count drying time and both firings. Factory production using molds and machines can complete the same stages in a few days, since drying and firing are done in bulk.
2. What temperature are ceramic plates fired at?
Ceramic plates usually go through two firings. Bisque firing sits between 900°C and 1,000°C, while the final glaze firing runs higher, often between 1,150°C and 1,300°C, depending on the clay body and glaze recipe used.
3. Why do handmade ceramic plates look slightly different from each other?
Handmade plates are shaped individually on a wheel or by hand, so small differences in thickness, glaze pooling, and surface texture are natural. These variations are not defects. They are proof that a real person made the piece rather than a machine.
4. Is glaze on ceramic plates safe for food?
Yes, when applied and fired correctly. Food-safe glazes are formulated and tested to be non-toxic once properly fired at the right temperature, which fuses the glaze into a smooth, sealed surface that does not leach into food.
5. What is the difference between bisque firing and glaze firing?
Bisque firing is the first firing, done before glazing, and it hardens the clay while keeping it porous enough to absorb glaze. Glaze firing is the second and final firing, done after glaze is applied, and it melts the glaze into a permanent, glossy or matte finish.
Shop Ceramic Plates